

Edit
Delete


3D Hologram Projector
Sections
Challenge Areas
Scout Method Elements
SPICES Growth Areas
The Adventure
Make videos come to life and float in 3D with a cool hologram projector.
Plan
- Investigate holograms, what they are, and how they work.
- Explore light and how we see. How does light travel through different surfaces?
- Read the safety information and discuss with your leaders or another appropriate adult what safety equipment, precautions, and supervision may be required. Ensure that you have these safety measures in place before starting the ‘Do’ section.
- Gather all the equipment that you need to make your 3D hologram projector. You will need the following equipment: a 25 cm long by 5.25 cm high piece of 2mm thick acrylic, a utility knife, a metal ruler, pliers, and tape.
Do
- Do NOT remove the protective paper until you are at the step that says to. Removal of the protective paper too early will cause scratches to the acrylic and diminish the performance of the projector.
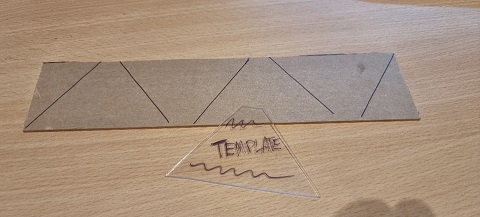
- Mark out 4 trapezoid panels on the protective paper of the acrylic. It is recommended to use a template. Each trapezoid is 1 cm on the shortest side, about 6 cm on each of the angled sides and 8 cm across the long side. It is important that the short side is not too long as it needs to sit in the middle of the images on the phone.
- Score along the marked lines using the ruler and knife. Score along each line at least 20 times to make a deep grove, making sure to score in the same place each time so as to not create multiple score lines.
- Using pliers, carefully snap the acrylic. It should snap cleanly along the score lines.
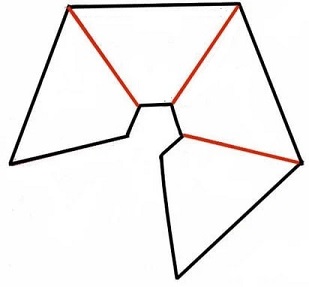
- Remove the paper and lay the panels out to form a pentagon with missing panel, as shown. There should be about a 2 mm gap between each panel.
- Tape between the panels to join them.
- Pick up the taped parts and join the last two panels together to form an inverted pyramid. You may need to change the tape around to get it to sit flat.
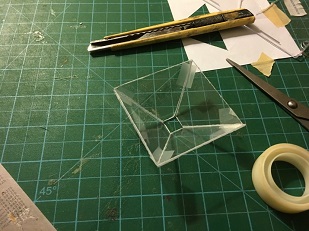
- Load up a hologram video and place the projector on the screen in the middle of the four images with the small edge on the screen and enjoy. You can find hologram videos by search “Hologram Projector Video” on YouTube such as this butterfly video
Review
- Did you successfully get a hologram to show? If not, what do you think went wrong?
- What could you do differently to improve your hologram either in making the projector or in viewing the video?
- What did you enjoy most about making your 3D hologram projector? What did you learn?
Safety
- Sharps risk: This activity uses a utility knife which is quite sharp and can cause cuts. Take care and ensure adult supervision is present.
- When snapping acrylic, splinters may fly. Wear safety glasses when doing these steps.
Variations
- Try sizing the projector up or down to make a bigger or smaller projector. How does this change the result?