

Da Vinci Bridge - Full Sized
Sections


Challenge Areas


Scout Method Elements


SPICES Growth Areas


The Adventure
Build a self-supporting bridge without ropes to cross
Plan
- Investigate Da Vinci bridges and how they work. What forces are in play?
- Investigate friction and what role this plays in the successful creation and use of a Da Vinci bridge?
- Read the safety information and discuss with your leaders or another appropriate adult what safety equipment, precautions, and supervision may be required. Ensure that you have these safety measures in place before starting the ‘Do’ section.
- Gather all the equipment that you need to make Da Vinci bridge. You will need the following equipment: 10 wooden beams and 5 smaller sticks. If making a human-sized Da Vinci bridge, the beams should be about 1.8 metre long and the sticks about 1 metre long. Something soft to land on is also advisable. If all beams cannot be the same size, they should be in sets of two matching as much as possible. You may also find these printable instructions useful.
Do
In these instructions, colours are mentioned. These coordinate to the images and assist in instruction clarity. You do not need to use a set with colours and can use whatever suitable pioneering spars or appropriate materials you have available. If building a human-sized Da Vinci bridge, this is best done with multiple people.
- Place two beams (yellow) on the ground parallel to each other. They should be placed so that there is less space between them than the length of the sticks. These two beams will form the left-hand feet of the bridge.
- Place one (green) of the smaller sticks under the two beams about 15 cm away from the end of the beams, and another (black) of the smaller sticks on top of the beams. There should be a gap of about 30 cm between the two sticks.
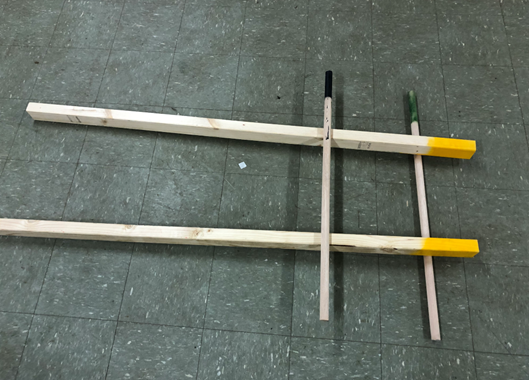
- Place two more beams (red) between the first two beams, weaving them under the green stick and over the black stick.

- Add another stick (black) underneath the two red beams about 15 cm away from the end of the beams.
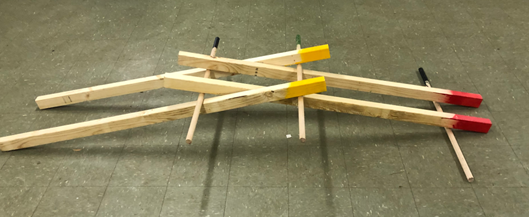
- Place an additional two beams (blue) outside the yellow and red beams, weaving the blue beams over the green stick and under the second black stick.
- Position another two beams (yellow) in line with the first two beams (yellow), ensuring that they pass over the second black stick.

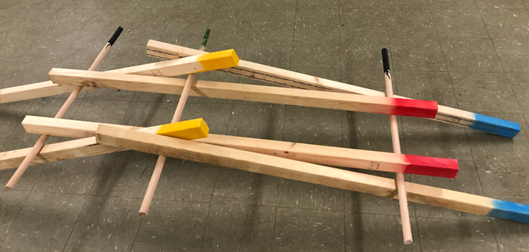
- Insert another stick (green) so that it goes under the blue beams and over the newly added yellow beams.
- Place the final stick (black) under the end of the second set of yellow beams.
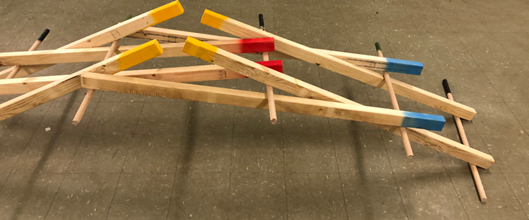
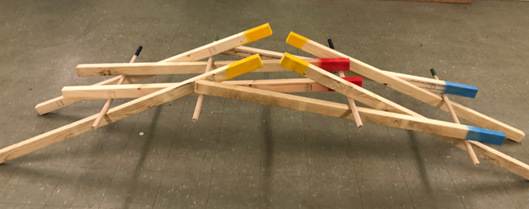
- Add the final two beams (red) by weaving them under the most recent black stick and the most recent green stick.
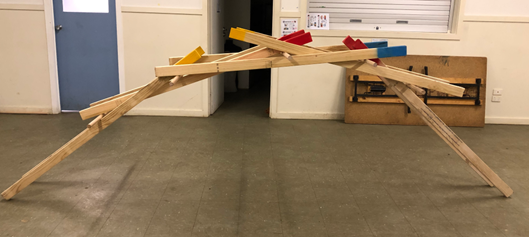
- Try walking over you Da Vinci bridge.
Review
- Did you successfully build a Da Vinci bridge? If not, what went wrong?
- What could you do differently to improve your Da Vinci bridge?
- What did you enjoy most about making your Da Vinci bridge? What did you learn?
Safety
• Splinter risk: Take care when handling wooden beams and sticks as you may get splinters.
• Falls, crashes, and collapses: Take care when crossing the Da Vinci bridge and when dismantling the Da Vinci bridge to ensure no one gets trapped when dismantling the Da Vinci bridge and when crossing the bridge. Ensure there is a soft surface for youth to fall onto.
Variations
• Da Vinci bridges can be built in a range of sizes using different sized materials. For younger sections or individual builds, you may wish to try making your Da Vinci bridge using popsicle sticks.
• You may wish to create a program around this by building a story around it such as needing to cross a river.
• Building of a Da Vinci bridge fulfils the OAS Stage 5 Bushcraft – Pioneering I Statement ‘I have built a structure that doesn’t need ropes to construct.'